-
-
January 8, 2018 at 4:52 pmjonnyflowersSubscriber
I am having issues attempting to get a model to converge as I am getting the highly distorted elements error.
I have tried increasing the time it takes to apply the load and tweaking a couple settings within Ansys.
If someone could give me some advice on how to overcome errors like this I would really appreciate it.
-
January 8, 2018 at 10:11 pmpeteroznewmanSubscriber
Hi Jonny,
Use Symmetry
Cut the problem in half by using a symmetry plane down the center of your block. You have a channel in the rubber material for most of the length. Do you need the rubber split into a Top and Bottom then bond it together with contact? It would solve faster using Share Topology.
Increase Mesh Density Near High Distortion
The initial mesh is being distorted and causing numerical problems and it stopped 3.8 mm out of 10 mm desired.
Bias your mesh to make smaller and more square elements at the surface where where the maximum distortion is occurring. A biased mesh would better cope with the displacement being applied. This mesh made it to 4.2 mm out of 10 mm, a bit better but not enough.
Contact with Surface Instead of Displacement
I assume the faces of the model that have the displacement applied are actually being squeezed by a surface. If you replace the displacement on the faces with displacement of a surface and add contact with the faces, you may get a more realistic simulation of the deformation. Is the edge of the surface actually a sharp corner, or does it have a small radius along the edge? Including a radius on the edge of the surface and enough elements on the rubber to follow the radius will help to have the model converge. In this example, the displacement got up to 8.7 mm out of 10 mm before an element distorted.
Regards,
Peter
-
January 9, 2018 at 3:46 ampeteroznewmanSubscriber
Mechanical Settings Best Practice
I noticed that you have duplicate contact definitions in your archive. If you right click on a folder in the Contact branch, and Check Overlapping Contact Regions, you will see a long list. This is caused by having a setting in Workbench, Tools, Options checked. With this checked, each time you Attach the CAD geometry, it automatically adds contact pairs on all the adjacent faces it finds. This is the installation default for ANSYS, but I think it is a dangerous setting.
-
January 9, 2018 at 7:03 pmpeteroznewmanSubscriber
Frictionless Support is limited to initial face dimensions
Another change needed in your model is to delete the frictionless support and replace it with an oversized rigid surface and frictionless contact. Frictionless support is a "short cut" that takes the faces picked and creates the rigid surface and contact for you "behind the scenes". This is a good time-saver when there are small displacements, but when there is large displacements, there is no surface for the material to expand onto. The node on the edge gets hung up on the edge of the invisible surface and gets highly distorted.
There may be a reason to use some friction, since the radius on the top rigid surface starts to apply a force on the rubber that pushes it to the right and ends up distorting the element at the edge of the fixed constraint on the bottom. Another solution might be to have the fixed constraint on the right vertical face of the rubber block instead of on a part of the bottom face. That would directly oppose the force put on by the frictionless radius.
https://youtu.be/ZkndficUwi8
-
January 10, 2018 at 3:23 pmjonnyflowersSubscriber
Thank you for the help Peter, I am running a simulation now that uses some of your advice. Unfortunately I can't use a radius as I am interested in the contact with the sharp edge. Would it be possible for you to attach an archive for the file you made so I can get a closer look at how you put it all together, I would really appreciate it.
Thanks
-
January 10, 2018 at 9:37 pmpeteroznewmanSubscriber
Hi Jonny,
If you have a sharp corner, the stress might be so high that you would cut the rubber, which you won't see in the simulation. You will need a very fine mesh below the corner to model the sudden change at the corner so even a small radius would help the solver to converge.
I used two more "tricks" to get the solution to solve to the full 10 mm of displacement. I don't know which one was necessary, or if both were, but those changes were to (1) add a hyperelastic material model (Yeoh 1st order) to your material, and (2) to change the SOLID186 element formulation using keyopt(2) and keyopt(6) to make the elements work better with incompressible materials.
https://youtu.be/nIzExt1qMEY
Without those changes, the solution failed to converge at 8.8 mm when the elements "exploded" into a pattern called "hourglass" mode. You don't want this to happen. It went from this...
to this on the next iteration.
I have attached an ANSYS 18.2 archive that solves in 7 minutes on 8 cores. I simplified the model by taking out the channels, but you could put them back in fairly easily with a pull operation. This is a coarse mesh and you will want more detail around the silicon chip. The contact is not performing well with this coarse mesh.
You can show your appreciation by clicking "Like" on the posts that are helpful. Good luck with your project!
Regards,
Peter
-
January 11, 2018 at 1:34 amjonnyflowersSubscriber
Thank you, I am running a sim at the moment with a lot of your advice thrown in.
Why the use of connectors instead of supports though?
-
January 11, 2018 at 3:02 ampeteroznewmanSubscriber
If you try to apply a fixed support to a rigid body, you will find you can't. You have to use a fixed joint to hold a rigid body to ground.
-
January 11, 2018 at 2:44 pmpeteroznewmanSubscriber
I took my model with the two "tricks" mentioned above: Hyperelastic material and Element Keyopts, and made two copies. I ran one copy with just the Hyperelastic material and the other copy with just the Element Keyopts. Neither copy ran to convergence. Both "tricks" are needed to run to convergence.
The Element Keyopts require a command snippet under each rubber geometry (ctrl drag works to copy it to the solid below). I set Element Control to Manual then the Brick Integration Scheme to Reduced. This is the same as Keyopt(2) but sometimes the solver reset Keyopt(2) when I left Element Control to Program Controlled instead of Manual.
-
January 11, 2018 at 2:59 pmjonnyflowersSubscriber
Thanks, I have added these tweaks and I am running the simulation now
Can I ask where you got the values you used for the Yeoh material properties?
Thanks
Jonny
-
January 11, 2018 at 4:50 pmpeteroznewmanSubscriber
If you go to the ANSYS Help and search for Yeoh, you will find an entry 4.6.11. Yeoh Hyperelasticity.
It documents that a first order N=1 model,
I used the shear modulus and bulk modulus calculated for the PDMS Elastic material model you provided to calculate c10 and d1 from the formulas above.
Regards,
Peter
-
January 12, 2018 at 12:23 amjonnyflowersSubscriber
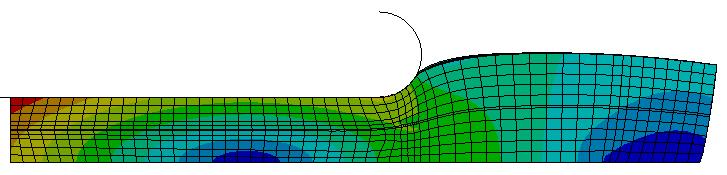
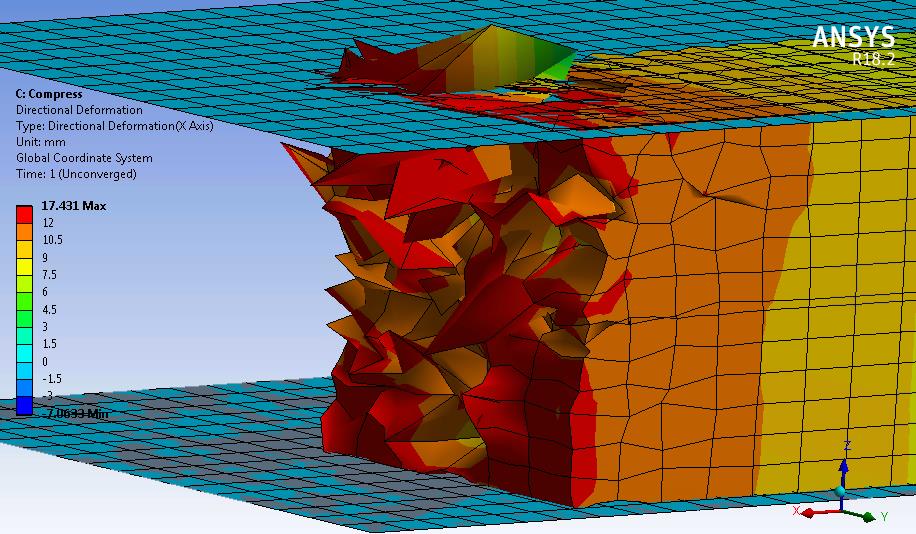
So with the next step in my model, I have been applying a set of hydrostatic elements to the interior of the channels, I am unsure if this works when I use symmetry. The script I am using is below and it is being solved with a transient analysis;
! Commands inserted into this file will be executed just after material definitions in /PREP7.
! Active UNIT system in Workbench when this object was created: Metric (m, kg, N, s, V, A)
! NOTE: Any data that requires units (such as mass) is assumed to be in the consistent solver unit system.
! It is assumed that NO SYMMETRY effects are in this model.
fini
/prep7
*get,typemax,ETYP,,NUM,MAX ! max defined element type
*get,realmax,RCON,,NUM,MAX ! max defined real constant
*get,mat_max,MAT,,NUM,MAX ! max defined material
*get,nodemax,NODE,,NUM,MAX ! highest numbered node in model
! Create a new higher number for element type, real, and material
newnode=nodemax+1000 ! number for pressure node for HSFLD242
newnumber=typemax+1
*if,realmax,ge,newnumber,then
newnumber=realmax+1
*endif
*if,mat_max,ge,newnumber,then
newnumber=mat_max+1
*endif
et,newnumber,HSFLD242 ! 3-D Hydrostatic Fluid Element
keyopt,newnumber,1,0 ! UX, UY, UZ, plus HDSP at pressure node
keyopt,newnumber,5,1 ! Fluid mass calculated based on the volume of the fluid element
keyopt,newnumber,6,1 ! Incompressible
mp,dens,newnumber,6440 ! Density of Galinstan, kg/m^3
! Ignoring thermal expansion in this example
type,newnumber ! Ignoring TB,FLUID in this example
mat,newnumber ! Ignoring Reference pressure for compressible gas
r,newnumber,0.10156 ! Applying intitial atomospheric Pressure = 0.10156 N/mm^2
real,newnumber !
cmsel,s,Channel1 ! Select nodes on interior
esln ! Select elements that touch these nodes
n,newnode,0,0,1.2e-002 ! Pressure node at 0,0,400 (automatically moved to centroid?)
ESURF,newnode ! ESURF HSFLD242 elements over solid element faces
! Extra node "newnode" with ESURF with HSFLD242
allsel
fini
/solu ! return to solving
-
January 12, 2018 at 1:09 ampeteroznewmanSubscriber
If you search the ANSYS Help for HSFLD242, you will find this paragraph that says you can use symmetry if you keep the pressure node on the symmetry plane.
The pressure node (Q) can be located anywhere in the fluid volume, except when the fluid volume has symmetry boundaries; in this case the pressure node must be located on the symmetry plane or on the intersection point or edge of multiple symmetry planes. The pressure node is automatically moved to the centroid of the fluid volume if there are no displacement degree-of-freedom constraints specified. To keep the pressure node on a symmetry line, you must specify symmetry boundary conditions at this node. (The displacement degrees of freedom at the pressure node do not have any displacement solution associated with them. They are only available for applying displacement degree of freedom constraints.) The pressure node is shared by all the hydrostatic fluid elements used to define the fluid volume.
The comment about NO SYMMETRY in the script above is probably because it is not coded to obey the rule on the pressure node. I'm not an APDL expert so I can't help with the script, I just know how to use scripts other people write for me : )
I am curious what is the function of a rubber block with fluid channels and a silicon chip; if you are willing to share...
-
March 7, 2019 at 4:18 amshazmiSubscriber
Hi Peter,
I also faced similar problem where the solution fail to converge due to distorted mesh. I have tried improve the mesh (using hypermesh), changed the element integration from full reduced, but still facing same issue.
My model is 3D wirebond product where the wire and silicone share the noeds. The loading is thermal cyclic loading from 150C to -40C and the silicone young modulus is temperature dependent. Distorted element always happen at the silicone (near the wire).
Do you have recomendation on the solver engine setting or anything that can counter this issue? Thanks Peter.
-
March 7, 2019 at 12:07 pmpeteroznewmanSubscriber
Hi Shazmi,
Please copy your post and paste it into a New Discussion in the Structural Mechanics section, that way, you will own the Discussion and get notified of replies. You can point to this discussion for reference using a link. Then you can delete the post above as it will be a duplicate.
-
March 8, 2019 at 1:29 amshazmiSubscriber
Thanks Peter,
I have created new post in New Discussion. Kindly need your help regarding this issue.
-
August 12, 2020 at 9:16 ambiomerielSubscriberhello,I'm running a similar model and getting the same problem, I've implemented all the solutions in this text except the Keyopts in the Command script under the hyper elastic geometries, i wrote out what i could see in the screen shot but unfortunately i received an error before my model ran. nany advice on how to write these commands so i don't get the highly distorted elements? nall the best,nmeriel n
-
August 12, 2020 at 10:42 ampeteroznewmanSubscriberYou must use Keyop(6) = 1 with Hyperelastic Material Model. Please create a New Discussion to discuss this further.n/forum/discussion/18002/convergence-during-large-deflection-of-hyperelastic-materialsn
-
- The topic ‘Convergence Issues – Highly Distorted Elements’ is closed to new replies.
- How to apply Compression-only Support?
- At least one body has been found to have only 1 element in at least 2 directions
- Error when opening saved Workbench project
- Geometric stiffness matrix for solid elements
- Script Error Code:800a000d
- Timestep range set for animation export
- Image to file in Mechanical is bugged and does not show text
- Elastic limit load, Elastic-plastic limit load
- Element has excessive thickness change, distortion, is turning inside out
- BackGround Color
-
1582
-
602
-
599
-
591
-
366
© 2025 Copyright ANSYS, Inc. All rights reserved.