TAGGED: spaceclaim
-
-
August 13, 2022 at 4:35 am
-
August 16, 2022 at 12:53 am
Charudatta Bandgar
SubscriberHello Nick Liu
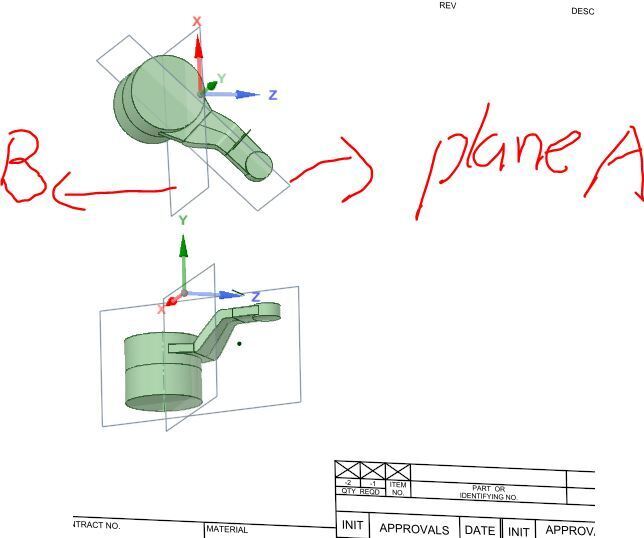
If I understand correctly, you want to create section view at the specified planes which is not the plane that you have selected for views. Is my understanding right? I think that will not be possible, but let me check that once.
Regards.
-
August 16, 2022 at 3:09 am
Nick Liu
Hi Charudatta Bandgar
Thank you for your reply. there are 3 normal projected views at the very beginning when you start the 2D drawing sheet. As far as I'm concerned, you can only use them to do other projected views or combine them to do the cross-section view. As some drawings are not symmetric and need to see cross sections from a different angle. So I would like to know if it's possible to use a plane as a reference to generate a cross-section view: Eg, plan A and Plane B which I attached in the picture before.
Or do I just need to lock the view I like and go back to the 3D drawing and change the reference to get cross sections to form different angles?
-
-
September 18, 2022 at 5:24 am
mg
SubscriberNick Liu , Charudatta Bandgar
The section view tool can only be oriented perpendicular to the drawing sheet, so there are a number of steps needed to prepare for placing various section views on a single drawing sheet when the planes associated with a section view are not aligned with the origin axes.
Enclosed is a finished single file (which is an Assembly model), with a drawing sheet to illustrate the final step to make the drawing.
Roughly, the work flow (and you may have a better method) is:
1. Make the solid component model.
2. In this model, add your 'normal' reference plane using two of the model oriigin axes (X-Z in my example).
3. Pick the other planar surfaces (or edges) that you want to use for the section views, and create a separate plane for each.
4. Save this model to 3 files (for this example), each with a different name (example Base Model, Plane A, Plane B), to prepare for the next step.
5. Open a new design file, and create a plane on the origin axes you're using, Make it large enough to fit 3 instances of the model (which you can do by placing dots on the grid).
6. Using the Assembly tab, insert one file at a time. First is the Base Model, which will be opened with its origin aligned with the Assembly file origin, and its normal plane aligned with the new plane created in the Assembly file.
7. Next insert the Plane A file, which will locate at the Assembly origin, and then move it a comfortable distance away from the origin, on the Assembly file plane. This will appear as a separate component in the Assembly file Structure Tree.
8. In the Plane A model, click to highlight the plane you're going to use for the section view. Then click the Align button, then click the Assembly file plane. The Plane A model will move so that its future section view plane is aligned with the Base Model plane.
9. Repeat steps 7 and 8 to insert the Plane B file and align it with the two other versions of the model.
10. In the design window, un-check visibility for the Plane A and Plane B models. Open a new drawing sheet, and place your Base Model 'overview' view (for example an isometric) with all the planes you created visible. Usually, make this an independent view.
11. Next, un-check visibility for the Base and Plane B models, check visibility for the Plane A model, then place the appropriate view on the drawing sheet (in the example the Top View of the Plane A model) and adjust its position on the page.
12. Then select the Cross-Section tool guide, select Horizontal or Vertical as applicable, and hover the guide on the edge of the plane visible in the Plane A view. Click, then move the new section view on the page, and make independent.
13. Repeat steps 11 and 12 for the Plane B model.Limitations:
1. If printing the drawing sheet to pdf or paper, the planes associated with a model are not printed, so if one wants to identify the location of the planes used for the cross sections, this needs to be done outside of SC (as in the example pdf).
2. The graphic lines shown in a cross section view are not SC 'edges,' so a cross section can't be accurately dimensioned in the drawing. If dimensions created by selecting Dimension | Select Bodies tool guides (as in the example) are not sufficient, the option is to slice each solid into at least two sections at the plane used for cross section views using the Combine tool, which will create selectable edges in either section of the component.Always new things to learn, even after 10 yrs w SC, and I wish I'd written more of them down.
🛈 This post originally contained file attachments which have been removed in compliance with the updated Ansys Learning Forum Terms & Conditions -
September 20, 2022 at 3:27 am
Nick Liu
Thank you very much, Maike.
I'll have a try.
Kind regards,
Nick
-
- The topic ‘Can I create a plane to generate a cross section’ is closed to new replies.


-
6379
-
1906
-
1457
-
1308
-
1022

© 2026 Copyright ANSYS, Inc. All rights reserved.


