Physics Setup — Lesson 5
The geometry and the mesh have been set up to solve the problem using Fluent. but a few things need to be considered before we proceed.
Double Precision
Both single and double precision versions of Fluent are available in Workbench. Although single precision is sufficiently accurate in most cases, the disparate length scale in our model (long, thin pipe) may create a large round-off error. Hence, we will use double precision to reduce this error.
Axisymmetric
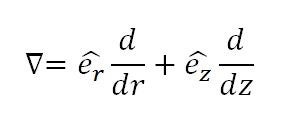
When Axisymmetric is selected, Fluent transforms the Cartesian coordinates to cylindrical polar coordinates. The gradient in the axis symmetric model now becomes:

Material Properties
The values entered in material properties will be applied to the constants in the governing equations.
Operating Condition
The absolute pressure is defined as the sum of the gauge pressure and the reference pressure:

In Fluent, the reference pressure can be specified under operating conditions. By default, the operating condition is 1 atm.
Open Fluent
Make sure a check mark appears next to the mesh panel in Workbench. Double click Setup ![]() to open Fluent.
to open Fluent.
Initial Settings
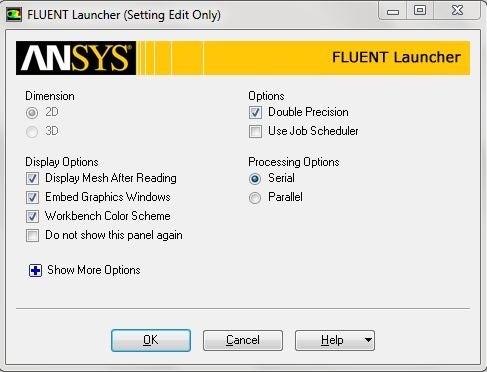
Before Fluent launches, we will be prompted to set some options. In Options check the box next to Double Precision.

Once the options are set, click OK.
Problem Setup — General
Now, Fluent should open. We will begin setting up some options for the solver. In the left-hand window (in what I will call the Outline window), under Problem Setup, select General. The only option we need to change here will address the fact that the pipe domain we created is axisymmetric. Under 2D Space, click the radio box next to Axisymmetric.
Models
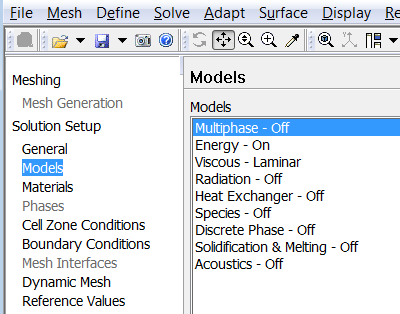
In the outline window, click Models. For a viscous model, laminar is the default, so we don't need to change that. We will need to utilize the energy equation to solve for the temperature. Under Models highlight Energy - Off and click Edit.... Now, the Energy window will launch. Check the box next to Energy Equation and hit OK.

Materials
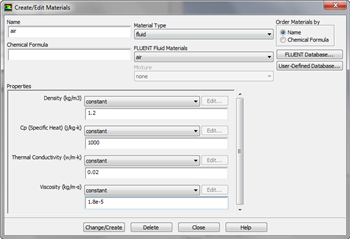
In the Outline window, highlight Materials. In the Materials window, highlight Fluid, and click Create/Edit.... This will launch the Create/Edit Materials window; here we can specify the properties of the fluid. Set the Density to 1.2, the Specific Heat to 1000, the Thermal Conductivity to 0.02, and the Viscosity to 1.8e-5.

Once finished, click Change/Create, then Close.
Boundary Conditions
Now we will specify the boundary conditions governing the problem. In the Outline window, highlight Boundary Conditions.
Operating Conditions
The default operating pressure in Fluent is 1 atm, which is 101325 Pa. We can equate the operating pressure to the absolute pressure by setting the gauge pressure to zero.
Centerline
Under Zone, highlight Centerline. Change the Type to axis. Confirm you are changing the selection, then leave the name as the default centerline.
Heated Wall
Under Zone, highlight heated_wall. The Type should have defaulted to wall. Next, click Edit.... Click the Thermal tab and select the Heat Flux radio button. Change the Heat Flux (w/m2) to 37.5. Click OK.
Inlet
Under Zone, highlight inlet. The Type should have defaulted to velocity-inlet. Next, click Edit.... In the Momentum tab, change the Velocity Specification Method to Components, and specify the Axial Velocity to 0.01. Click OK.
Isothermal Wall
Under Zone, highlight isothermal_wall. The Type should have defaulted to wall. Next, click Edit.... Click the Thermal tab and select the Temperature radio button. Change the Temperature (K) to 300. Click OK.
Outlet
Under Zone, highlight outlet. The Type should have defaulted to pressure-outlet. Next, click Edit.... In the Momentum tab and ensure that the Gauge Pressure is 0. Click OK.

