Geometry — Lesson 3
Download the Airfoil Coordinates
In this step, we will import the coordinates of the airfoil and create the geometry we will use for the simulation. Begin by downloading this file here and saving it somewhere convenient. This file contains the points of a NACA 0012 airfoil.
Launch DesignModeler
Before we launch Ansys DesignModeler, we need to specify the problem as a 2D problem. Right click ![]() and select Properties . In the Properties of Schematic A2: Geometry Window, select Analysis Type > 2D . Now, double click
and select Properties . In the Properties of Schematic A2: Geometry Window, select Analysis Type > 2D . Now, double click ![]()
to launch DesignModeler. When prompted, select Meters as the unit of measurement.
Airfoil
First, we will create the geometry of the airfoil. In the menu bar, go to Concept > 3D Curve. In the Details View window, click Coordinates File and select the ellipsis ![]() to browse to a file. Browse to and select the geometry file you downloaded earlier. Once you have selected the desired geometry file, click
to browse to a file. Browse to and select the geometry file you downloaded earlier. Once you have selected the desired geometry file, click ![]() to create the curve. Click
to create the curve. Click ![]() to get a better look at the curve.
to get a better look at the curve.
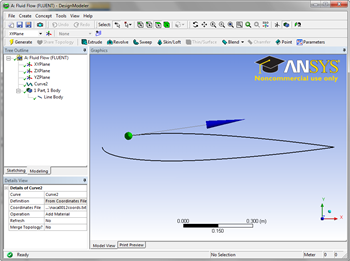
Next, we need to create a surface from the curve we just generated. Go to Concepts > Surfaces from Edges. Click anywhere on the curve you just created, and select Edges > Apply in the Details View Window. Click ![]() to create the surface.
to create the surface.

Create C-Mesh Domain
Now that the airfoil has been generated, we need to create the meshable surface we will use once we begin to specify boundary conditions. We will begin by creating a coordinate system at the tail of the airfoil; this will help us create the geometry for the C-mesh domain. Click ![]() to create a new coordinate system. In the Details View window, select Type > From Coordinates . For FD11, Point X , enter
to create a new coordinate system. In the Details View window, select Type > From Coordinates . For FD11, Point X , enter 1.
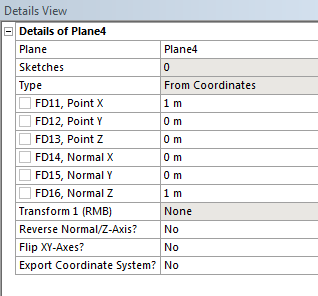
Click ![]() to generate the new coordinate system. In the Tree Outline Window, select the new coordinate system you created (defaulted to Plane 4), then click
to generate the new coordinate system. In the Tree Outline Window, select the new coordinate system you created (defaulted to Plane 4), then click ![]() to create a new sketch. This will create a sketching plane on the XY plane with the tail of the airfoil as the origin. At the bottom of the Tree Outline Window, click the Sketching tab to bring up the sketching window.
to create a new sketch. This will create a sketching plane on the XY plane with the tail of the airfoil as the origin. At the bottom of the Tree Outline Window, click the Sketching tab to bring up the sketching window.
The first action we will take is create the arc of the C-Mesh domain. Click ![]() . The first click selects the center of the arc, and the next two clicks determine the end points of the arc. We want the center of the arc to be at the tail of the airfoil. Click on the origin of the sketch, making sure the P symbol is showing
. The first click selects the center of the arc, and the next two clicks determine the end points of the arc. We want the center of the arc to be at the tail of the airfoil. Click on the origin of the sketch, making sure the P symbol is showing
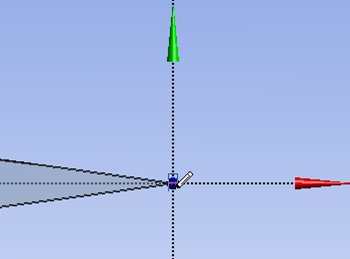
For the end points of the arc, first select a point on the vertical axis above the origin (a C symbol will show), then select a point on the vertical axis below the origin. You should end up with the following:
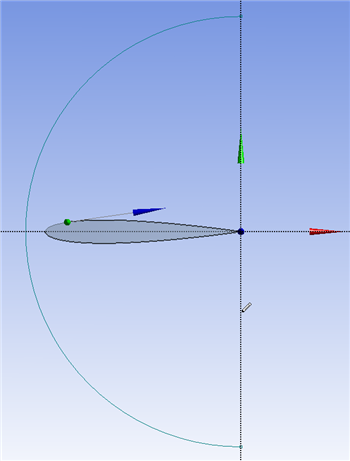
To create the right side of the C-Mesh donain, click ![]() Click the following points to create the rectangle in this order: where the arc meets the positive vertical axis, where the arc meets the negative vertical axis, then anywhere in the right half plane. The final result should look like this:
Click the following points to create the rectangle in this order: where the arc meets the positive vertical axis, where the arc meets the negative vertical axis, then anywhere in the right half plane. The final result should look like this:
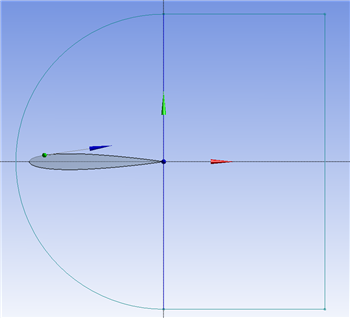
Now, we need to get rid of necessary lines created by the rectangle. Select Modify in the Sketching Toolboxes window, then select![]() . Click the lines of the rectangle that are collinear with the positive and negative vertical axes. Now, select the Dimensions toolbox to dimension the C-Mesh domain. Click
. Click the lines of the rectangle that are collinear with the positive and negative vertical axes. Now, select the Dimensions toolbox to dimension the C-Mesh domain. Click ![]() , followed by the arc to dimension the arc. Assign the arc a value of
, followed by the arc to dimension the arc. Assign the arc a value of 12.5. Next, select ![]() . Click the vertical axis and the vertical portion of the rectangle in the right half plane. Also assign the horizontal dimension a value of
. Click the vertical axis and the vertical portion of the rectangle in the right half plane. Also assign the horizontal dimension a value of 12.5.
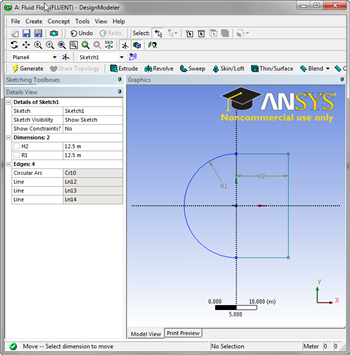
Next, we need to create a surface from this sketch. To accomplish this, go to Concept > Surface From Sketches. Click anywhere on the sketch, and select Base Objects > Apply in the Details View Window. Also, select Operation > Add Frozen. Once you have the correct settings, click![]() . The final step of creating the C-Mesh is creating a surface between the boundary and the airfoil. To do this, go to Create > Boolean. In the Details View window, select Operation > Subtract. Next, select Target Bodies > Not selected, select the large C-Mesh domain surface, then click Apply. Repeat the same process to select the airfoil as the Tool Body. When you have selected the bodies, click
. The final step of creating the C-Mesh is creating a surface between the boundary and the airfoil. To do this, go to Create > Boolean. In the Details View window, select Operation > Subtract. Next, select Target Bodies > Not selected, select the large C-Mesh domain surface, then click Apply. Repeat the same process to select the airfoil as the Tool Body. When you have selected the bodies, click ![]() .
.
Selecting the Airfoil Body
Because the C-Mesh domain and the airfoil overlap, once you click in the vicinity of the airfoil the Ansys software will select the C-Mesh domain but give you the option of selecting multiple layers.

Select the layer that corresponds to the airfoil and the airfoil will be highlighted.
Create Quadrants
In the final step of creating the geometry, we will break up the new surface into 4 quadrants; this will be useful for when we want to mesh the geometry. To begin, select Plane 4 in the Tree Outline Window, and click ![]() . Open the sketching menu and select
. Open the sketching menu and select ![]() . Draw a line on the vertical axis that intersects the entire C mesh. Trim away the lines that are beyond the C-Mesh, and you should be left with this:
. Draw a line on the vertical axis that intersects the entire C mesh. Trim away the lines that are beyond the C-Mesh, and you should be left with this:
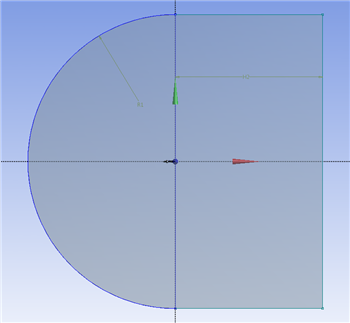
Next, go to Concepts > Lines from Sketches. Select the line you just drew and click Base Objects > Apply , followed by ![]() . Now that you have created a vertical line, create a new sketch and repeat the process for a horizontal line that is collinear to the horizontal axis and bisects the geometry.
. Now that you have created a vertical line, create a new sketch and repeat the process for a horizontal line that is collinear to the horizontal axis and bisects the geometry.
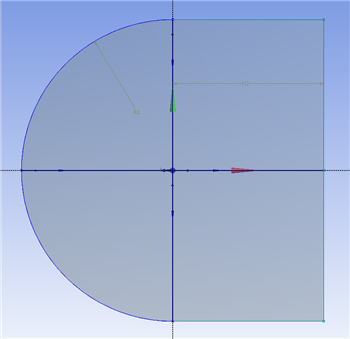
Now, we need to project the lines we just created onto the surface. Go to Tools > Projection. Select Edges, press Ctrl and select on the vertical line we drew (you'll have to select both parts of it), then press Apply. Next, select Target and select the C-Mesh surface, then click Apply.
Once you click ![]() , you'll notice that the geometry is now composed of two surfaces split by the line we selected. Repeat this process to create 2 more projections: one projectng the line left of the origin onto the left surface, and one projecting the right line onto the right surface. When you're finished, the geometry should be split into 4 parts.
, you'll notice that the geometry is now composed of two surfaces split by the line we selected. Repeat this process to create 2 more projections: one projectng the line left of the origin onto the left surface, and one projecting the right line onto the right surface. When you're finished, the geometry should be split into 4 parts.
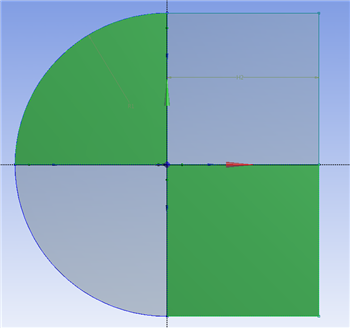
Suppress the line bodies by right clicking in the tree. You only need the surface body to be transferred to the mesher.
The geometry is finished. Save the project and close DesignModeler, as we are now ready to create the mesh for the simulation.
For users of Ansys 15.0, please check the following topic for procedures for turning on the Auto Constraint feature before creating sketches in DesignModeler.

