-
-
May 8, 2025 at 2:31 pm
Usman
SubscriberDear ANSYS Support Team,
I hope this message finds you well.
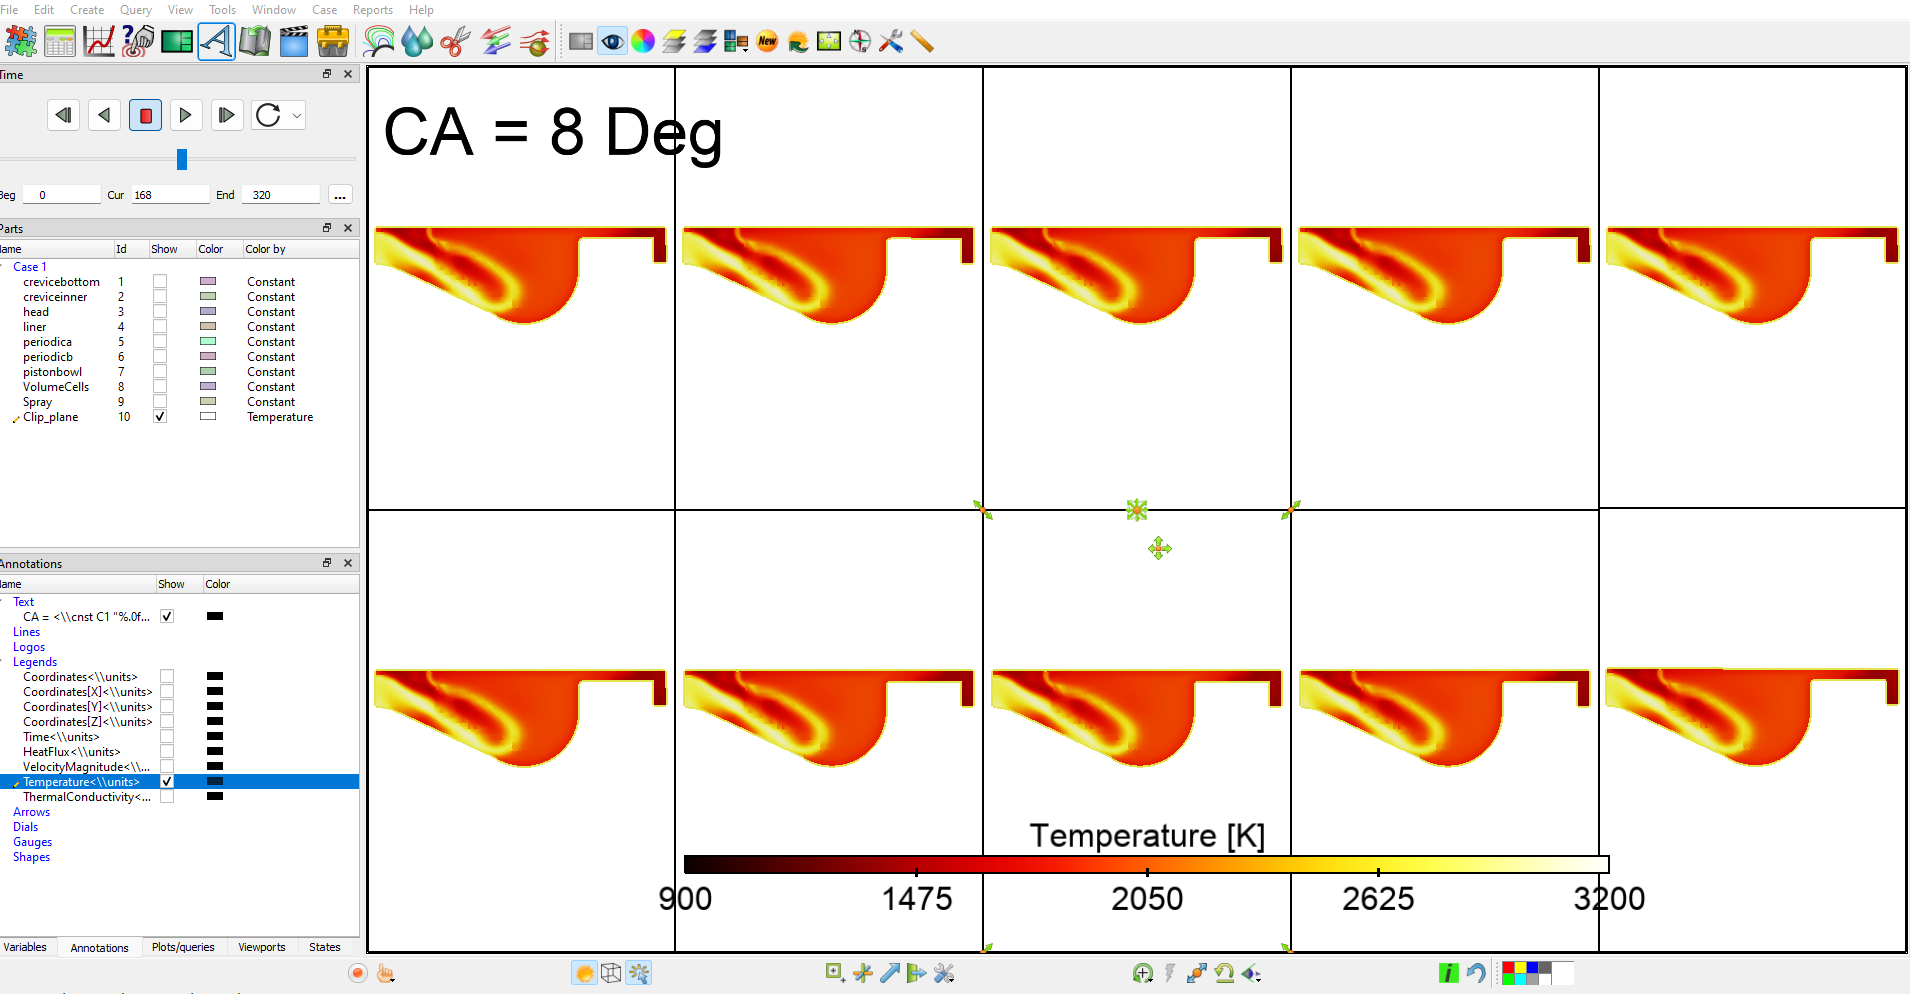
I am using EnSight 2024 R2 to visualise results from an ANSYS Forte sector mesh simulation. My goal is to display different crank angle (CA) time steps in multiple viewports (e.g., CA = 0°, 10°, 20°, etc.) for side-by-side comparison.
However, I’ve been unable to find a way to independently control the time step in each viewport. The typical options such as “Time → Lock Viewports” or “Link → Time” (via right-click menu) are no longer available in this version, and methods such as
Ctrl + scrollhave not resolved the issue. Each viewport remains locked to the same global time.I have attached a screenshot showing my current layout, where I wish to assign a different CA to each sub-view.

Could you kindly advise how to:
Decouple time control per viewport
Assign and fix specific crank angles to each
Annotate them accordingly, if needed
Your assistance is highly appreciated, as this functionality is key for visualising CA-dependent combustion phenomena.
Best regards,
Usman Saeed -
May 14, 2025 at 10:07 am
CFD_Friend
Ansys EmployeeHi Usman,
To achieve your goal of displaying different crank angle time steps independently in multiple viewports for side-by-side comparison, you can use a strategy involving loading your case multiple times as separate cases, assigning each case to a specific viewport, and then "freezing" the display of parts within each case at the desired time step.
Here is a breakdown of how you can approach this based on the provided documentation:
1. Load the dataset multiple times as separate cases: EnSight allows you to read multiple casesand work with them individually in the same session. You can load the same transient dataset multiple times using Case → Add... from the main menu.
2. Define multiple viewports: EnSight supports up to sixteen user-defined viewports in the Graphics Window. On startup, you get one default viewport, and you can create new ones. You'll create a viewport for each crank angle you wish to display. These viewports can be sized, positioned, and transformed independently. You can arrange them automatically using Viewports → Auto arrange.
3. Assign cases to specific viewports (Viewport Visibility per Case): Part visibility can be set on a per-viewport basis. This is extended to cases: if you have multiple cases, you can set which cases are visible in which viewports.- To display one case (representing one crank angle) per viewport:
- Select the desired case from the Case menu (Case → casename).
- Select Case → Viewport Visibility.
- Use the dialog to click in viewports (green enables display, red disables) to control where parts from the selected case are visible
4. Set the time step for each case and "freeze" the display: Once you have your cases loaded and assigned to viewports, you need to set each case to the specific crank angle time step you want to display in its assigned viewport.
- Navigate to the desired time step using the global Solution Time controls. For example, set the global time to CA=0°. While the global time is at CA=0°, go to the viewport/case assigned to CA=0°. The parts in this case should update to this time. Now, to decouple this case from future global time changes, you can use the Active toggle for parts. This toggle controls whether or not the display of a part automatically updates as the global solution time changes. Select all parts belonging to the case you just set to CA=0°.
- In the Part list, you can toggle off their Active property. When Active is off for a part, its display is frozen at the current time step, while the server part is kept current.
- Repeat this process: Change the global time to the next desired CA (e.g., 10°). Go to the viewport/case assigned to CA=10°. The parts in this case will update to 10° (assuming their Active toggle is still on by default). Select these parts and toggle their Active property off.
- Continue for all desired crank angles and their corresponding cases/viewports.
By setting the global time to a specific step and then freezing the display of the parts for the corresponding case/viewport using the Active toggle, you effectively fix that viewport's display at that particular time step, regardless of further changes to the global time slider or other cases.
-
May 15, 2025 at 3:00 pm
Usman
SubscriberThank you very much for your detailed explanation on how to load multiple cases in EnSight and manage different crank angle views using multiple viewports. Your step-by-step breakdown is greatly appreciated and has helped clarify the general workflow.
I would be very grateful if you could kindly provide a few illustrative figures or screenshots to visually guide me through the steps, especially for setting viewport visibility and freezing parts at specific time steps.
Additionally, I was unable to locate the "Active toggle" option in my version of EnSight. Could you please advise where I can find it or how to enable it?
Thank you once again for your support.
Best regards,
Usman Saeed
-
- You must be logged in to reply to this topic.


-
3155
-
1013
-
956
-
858
-
797

© 2025 Copyright ANSYS, Inc. All rights reserved.


